


Choose your router
Setup and troubleshoot your Plusnet Hub

Hub Two router
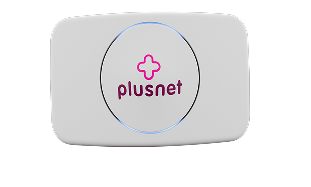
Hub Two router help
Everything you need to set up and get the best from the Hub Two.
Watch our short three min video or read our guide to get set up.
If the video doesn't display, you can watch it on YouTube (opens new tab or window)
Our hub connects to an Openreach Optical Network Terminal or ONT, not a phone socket. When the engineer installs the ONT, make sure it’s in a convenient spot so you can easily plug the hub into it.
For the best WiFi experience:
- place the hub near where you use WiFi most
- avoid the kitchen, cupboards or enclosed spaces
- keep it on a shelf or table, not the floor
- keep away from other devices
- avoid thick walls and large objects
We’ve sent you a lovely box of goodies you need to get set up. In the box you’ll find:


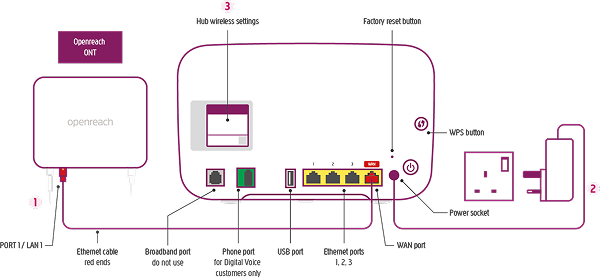
- Connect the Hub Two
Plug one red end of the Ethernet cable into the hub’s WAN port. Then plug the other red end into the PORT 1 / LAN 1 port on your Openreach Optical Network Terminal or ONT. The number of ports on your ONT may differ. - Connect the power supply
Slide the two parts of the power supply together until they click into place. Plug the hub into a mains socket and press the Power button. After around three minutes, a blue light will show that the hub is ready. - Connect your devices
Use the hub’s WiFi name and password to connect your devices to the Internet. You’ll find these on the pull-out card on the back of the hub or on the sticker we sent you. You can also connect in other ways:
- QR code - scan it for a quick connection.
- WPS - press the hub’s WPS button which will flash blue, then follow your device’s instructions.
- Ethernet - plug the yellow ended cable into your device and the hub.
Control WiFi and hub settings
Check or change your WiFi settings, including port forwarding.
To view the Hub Manager:
- Open a new browser window e.g Chrome, Firefox or Safari.
- Enter 192.168.1.254 in the address bar.
You'll see a security warning when accessing the Hub Manager, this is normal and safe to continue. From here you can manage the hub settings, and change your WiFi name and password. Some settings need the hub admin password, which you'll find on the back of the hub or on the password sticker.
If you’re having issues with your broadband, try selecting the Help tile on the Hub Manager home page.
The WiFi network or SSID starts with PLUSNET and has letters or numbers at the end, e.g. PLUSNET-1A2B3C. The WiFi password or key is 10 characters long and it's case sensitive.
To check your settings:
- Log into the Hub Manager.
- Click Wireless.
- Enter your admin password.
You’ll now see information about the WiFi bands broadcasting from the hub. Click the i icon to the left of each item for an explanation of what it does.
To change the WiFi settings of the hub:
- Log into the Hub Manager.
- Click Wireless.
- Enter your admin password.
- Click Change settings.
You might need to reconnect to your network after changing some of these settings, particularly the Network name, Security type or Security password. Click the i icon to the left of each item for an explanation of what it does.
The Hub supports UPnP which means that compatible games and applications will set up Port Forwarding automatically and you won't have to do anything. For games and apps that don't support this, you can set up Port Forwarding manually.
- Log into the Hub Manager.
- Click Advanced Settings.
- Enter your admin password and then click Firewall.
- Click Create a new port forwarding rule.
- Enter the details for your port forwarding rule.
- Click the + icon.
- Click Save.
Connection help
Check the hub lights or do a factory reset on the hub.
If you think there's an issue with the Hub Two, follow these steps and then check the lights to see what's wrong.
First, check everything's plugged in, switch your computer and other devices off and then on again.
What the hub lights mean

Blue
The hub is connected to your broadband.
If you can’t get online, try restarting your device. If this is your first time connecting, wait a minute or two.

Orange
The hub is on, but isn’t connected to the Internet.
Connect a device to the hub. Open a new web browser window and follow the on-screen steps to get connected. If that doesn’t work, try resetting the hub.

No light
The power is off or the lights have been turned off in the Hub Manager.
Check the hub is plugged in and switched on. If needed, turn the lights back on in the Hub Manager.

Red
There’s a problem with your connection.
Use the power button to turn the hub off and on again. If it still doesn’t turn blue, reset it.

Green
The hub is starting up.
Wait about three minutes for it to turn blue. If it stays green, restart or reset the hub.

Pink
The hub is in Bridge Mode
The hub has been switched to 'modem only' mode. Full Fibre doesn't support this. You can disable Bridge Mode in the Hub Manager. If needed, reset the hub.
Flashing orange
The hub is working but the Ethernet cable isn't connected
Check if the Ethernet cable with red ends is plugged in properly. If your ONT's got more than one PORT / LAN port, then try each one. Wait a few minutes each time to see if the light stops flashing.
WPS button
Flashing blue
If it's flashing blue it's waiting for you to press the WPS button on your computer or device.
Flashing red
If it's flashing red, it didn’t connect. Give it a couple of minutes and try again.
No connection:
- check the hub is switched on and lights are showing
- check the cables are connected to the ONT
- restart the hub off, wait 30 seconds, then switch it back on
Slow or dropping WiFi:
- test your connection near the hub
- place the hub somewhere more open and central
- keep it off the floor on a shelf or table
- keep it away from other devices and obstacles
If you're still having issues, do a factory reset:
- Use a paper clip, pen or something pointed to press the reset pinhole on the back of the router.
- Keep the button pressed for 20 seconds, until the light on the front of the hub turns green, then release the reset button.
- When the light on the front turns blue, it's now restored to factory settings.
Important when resetting the hub, all of the original factory settings will be restored. So any changes you’ve made will be lost, meaning you’ll need to set them up again.

Hub One router
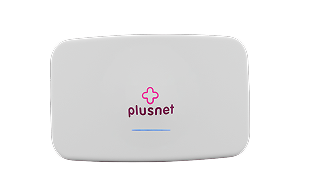
How to reconnect and set up the Hub One
For the best experience:
- place our hub near where you use WiFi most
- avoid the kitchen, cupboards or enclosed spaces
- position it on a shelf or table, off the floor
- don’t put it on carpets or next to other devices
- keep it away from thick walls and large objects
Wireless connection
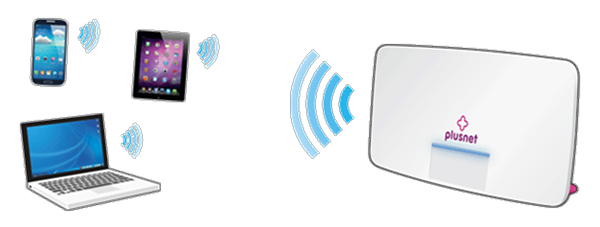
To connect wirelessly, follow the steps on your device to connect to our router using WiFi. If you need help, see our wireless connection guide.
You’ll find your network name and password on the handy reference card on the back of the hub.
The WiFi network or SSID starts with PLUSNET and has letters or numbers at the end, e.g. PLUSNET‑A1BC. The WiFi password or key is 10 characters long and it's case sensitive.
Wired connection
If you’re using an Ethernet cable with yellow ends:
- Plug one end into any of the four yellow Ethernet ports on the back of the hub.
- Plug the other end into the Ethernet port on your computer or laptop.
This is the easy part. Give the hub a few minutes to configure settings and connect to the Internet. While it's doing this, go make yourself a drink.

Wait for at least five minutes before moving on to the next step.
Once it’s ready, open a web browser such as Chrome, Safari or Firefox. You should be able to see your homepage.
- Check all cables are connected properly and restart your devices.
- Press and hold the hub's Restart button until the light turns orange.
- Wait for the hub to restart. The light will cycle through green, blue and orange.
- When the light turns solid blue, you're back online.
- If the light doesn't stay blue, check the troubleshooting steps for the light colour you're seeing.
Power lights status at the back of the hub
Power light is green or flashing green
Wait a few of minutes for the hub to start. The light will stay blue for more than 20 seconds when it's ready.
Power light is blue
The hub is working fine. If you can't get online, check your device or computer settings.
Power light is off
The hub isn’t getting power. Check the switch on the back is on, the power cable is plugged in and the mains is switched on.
Power light is orange
There’s a connection problem. Log in to the Hub Manager at 192.168.1.254 and check the Internet status. If it says ‘Disconnected’, click Connect.
Power light is red
There’s a problem with the hub. Press Restart and release when the light turns orange.
It should restart and turn blue. Still red? Reset using the button on the back.
Broadband lights status at the front of the hub
Broadband light is orange
You're connected to broadband but your account might not be switched on yet. Wait until after midnight on your activation day.
Broadband light is red
You've tried to log in with the wrong username and password. Reset the hub to factory settings using the Reset button on the back. Your default details are on the card that came with the hub.
Broadband light is flashing red
There’s a problem with your broadband line. Check all cables are plugged in correctly and that it’s after midnight on your activation day.
WiFi Protected Setup or WPS lights status on the side of the hub
Wireless light is orange
You've switched off wireless security for one or both wireless channels. Turn on your security in the wireless tab in the Hub Manager at 192.168.1.254
Wireless light is flashing orange
The hub is in WPS mode. Press the Connect button on your device to join without a password. It will return to normal after a few minutes.
If you're still having issues, do a factory reset:
- Use a paper clip, pen or something pointed to press the reset pinhole on the back of the router near the power and USB ports.
- Keep the button pressed for 20 seconds, until the light on the front of the hub turns or flashes green.
- Let it restart. Release the button and wait roughly five minutes for the hub to complete its startup sequence and reconnect
Important by resetting our hub, restores it back to the factory settings. Any changes you’ve made will be lost, so you’ll need to set them up again.
Microfilters stop your phone and broadband signals interfering with each other. Without them, you may experience connection issues, slow speed, or noise on your phone line.
Check what type of socket you have:
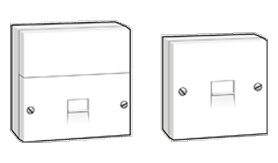
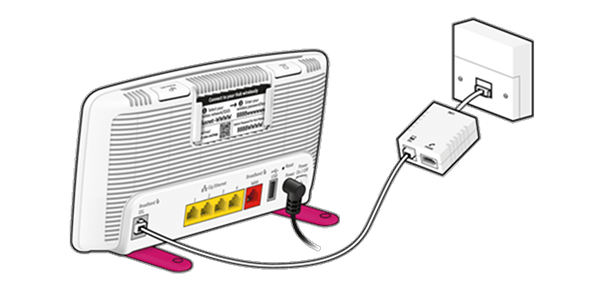
- Standard master socket or no master socket. Use a microfilter to connect the hub.
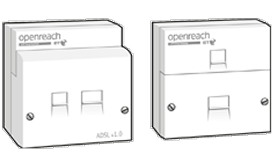
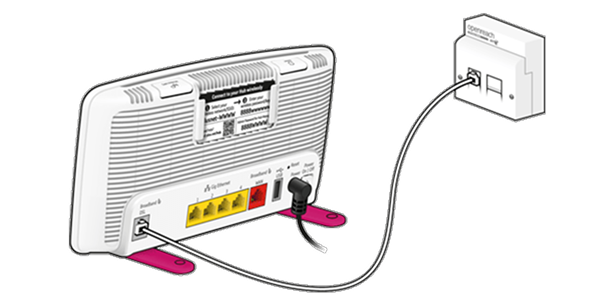
- Double master socket. No microfilter is needed. Connect the hub directly to the smaller socket.
Connect the microfilters
- Connect one end of the grey Internet cable to the DSL port on the hub, and the other end to the DSL port on the microfilter.
- We recommend using the master telephone socket for the best speeds. It’s closest to where the phone line enters your property.
- As well as your phone, sockets can be used by alarm systems and digital TV boxes, so make sure you don't miss any.
Plug in the Hub One
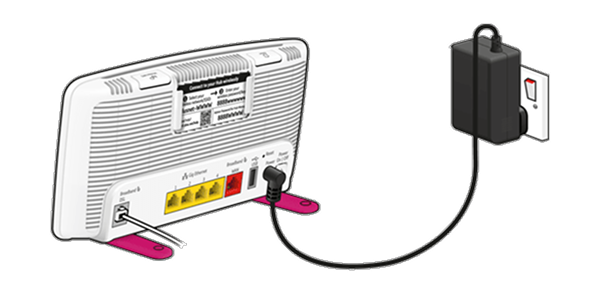
- Slide the three-pin plug onto the power unit until it clicks into place.
- Plug the power cable into the hub and switch on. The hub lights should now come on.

2704n router
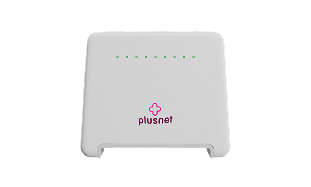
How to reconnect and set up the Hub Zero 2704n
For the best experience:
- place our hub near where you use WiFi most
- avoid the kitchen, cupboards or enclosed spaces
- position it on a shelf or table, off the floor
- don’t put it on carpets or next to other devices
- keep it away from thick walls and large objects
Microfilters stop your phone and broadband signals interfering with each other. Without them, you may experience connection issues, slow speed, or noise on your phone line.
Check what type of socket you have:
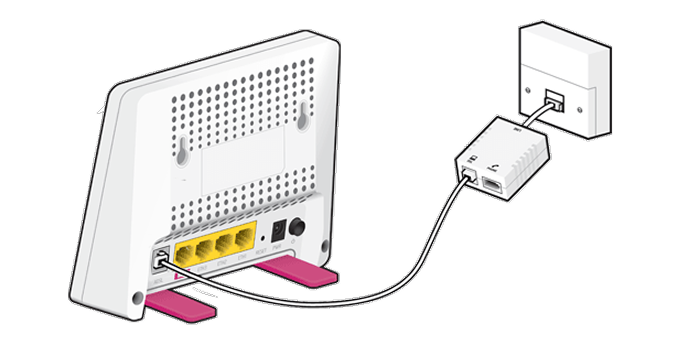
- Standard master socket or no master socket. Use a microfilter to connect the hub.
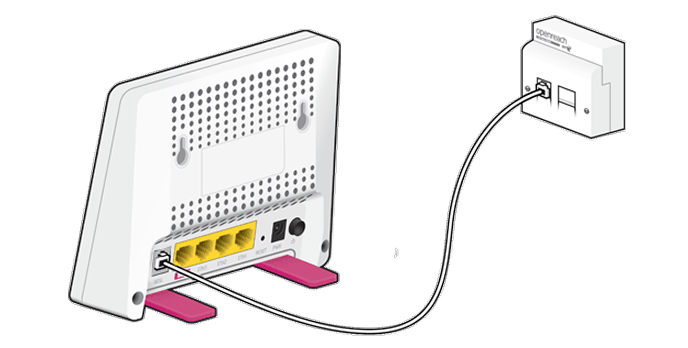
- Double master socket. No microfilter is needed. Connect the hub directly to the smaller socket.
Connect the microfilters
- Connect one end of the grey Internet cable to the DSL port on the hub, and the other end to the DSL port on the microfilter.
- We recommend using the master telephone socket for the best speeds. It’s closest to where the phone line enters your property.
- As well as your phone, sockets can be used by alarm systems and digital TV boxes, so make sure you don't miss any.
Plug in the Hub Zero 2704n
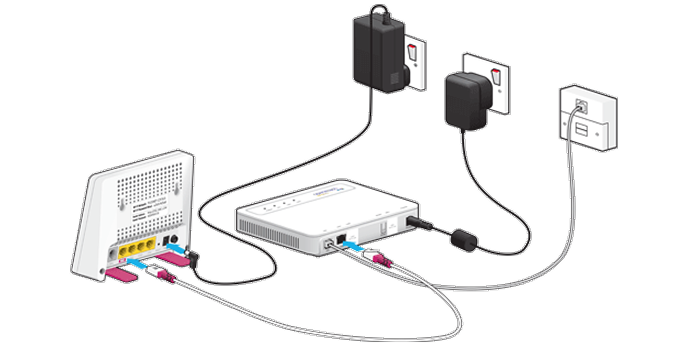
- Slide the three-pin plug onto the power unit until it clicks into place.
- Plug the power cable into the hub and switch on. The hub lights should now come on.
- At the bottom of your router, you'll see two little 'feet' to help it stand. Extend them out so it's sitting steady
- Put the power adapter together by sliding the plug into the main unit the black box until you hear it click into place. Then plug this part into a wall socket, and the other side into the back of your router.
- Find the Ethernet cable with the red ends. It came with your router. Plug one end into the LAN 1 socket on your Openreach modem. Then plug the other end into the fourth Ethernet socket on the back of the router. It's the one that has a red sticker under it
- Press the black power button at the back of the router to switch on. When the Power light goes green, it's on. But this can take about a minute
Wireless connection

To connect wirelessly, follow the steps on your device to connect to our router using WiFi. If you need help, see our wireless connection guide
You’ll find your network name and password on the handy reference card on the back of the hub.
- Your WiFi network name or SSID starts with PLUSNET followed by letters or numbers, for example: PLUSNET‑A1BC.
- Your WiFi password or key is 10 characters long and case sensitive, so enter it exactly as shown.
Wired connection

This is the easy part. Give the hub a few minutes to configure settings and connect to the Internet. While it's doing this, go make yourself a drink.
Wait for at least five minutes before moving on to the next step.
Once it’s ready, open a web browser such as Chrome, Safari or Firefox. You should be able to see your homepage.
If the broadband light is flashing instead of solid green, there may be an issue with the broadband signal. Follow the steps in our connection troubleshooting guide
Power lights status
Power off
It's off. Check the cables and that you've switched it on at the back and at the wall socket.
Power red
It couldn't start up and went into recovery mode.
Power green
It's ready to use.
Broadband lights status
Broadband off
It's in Fibre mode. Check the lights on the Openreach modem instead.
Broadband flashing
There's a problem with the broadband signal. Make sure all the cables and microfilters are plugged in properly.
Broadband green
Broadband's detected and working.
Internet lights status
Internet off
There's no Internet connection.
Internet red
The Internet connection isn't working. Open your web browser and following the steps on your screen. It might be because you've used the wrong username and password, so double check them and try again.
Internet green
It's connected to the Internet.
Internet flashing
It's transferring data.
WiFi lights status
WiFi off
WiFi's off.
WiFi green
WiFi's on.
WiFi flashing
It's transferring data.
Ethernet lights status
Eth 1-4 off
There aren't any devices connected with the Ethernet cable.
Eth 1-4 green
You've got a device connected using an Ethernet cable.
Eth 1-4 flashing
It's transferring data.
WiFi Protected Setup or WPS lights status
WPS off
WPS's off.
WPS flashing
WPS's on and ready to connect.
Openreach modem lights status
Power off
It's switched off.
Power yellow
It's starting up. It should turn green shortly.
Power green
It's powered up and ready to use.
DSL off
It can't find a broadband signal.
DSL flashing green
There's a problem with your broadband connection.
DSL green
Your broadband's connected and working.
LAN 1 off
It can't find a connection to your router or the Ethernet cable isn't connected.
LAN 1 green
The Ethernet cable's connected.
LAN 1 flashing
It's transferring data.
If you're still having issues, do a factory reset:
- Use a paper clip, pen or something pointed to press the reset pinhole on the back of the router near the power and USB ports.
- Keep the button pressed for 20 seconds, until the light on the front of the hub turns or flashes green.
- The Hub Zero won’t automatically configure itself following a factory reset. You’ll need to manually re-enter your broadband username and password using the Hub Manager. If you need help with this then get in touch.
Important by resetting our hub, restores it back to the factory settings. Any changes you’ve made will be lost, so you’ll need to set them up again.
Hub Two router help
Everything you need to set up and get the best from the Hub Two.
Watch our short three min video or read our guide to get set up.
If the video doesn't display, you can watch it on YouTube (opens new tab or window)
Our hub connects to an Openreach Optical Network Terminal or ONT, not a phone socket. When the engineer installs the ONT, make sure it’s in a convenient spot so you can easily plug the hub into it.
For the best WiFi experience:
- place the hub near where you use WiFi most
- avoid the kitchen, cupboards or enclosed spaces
- keep it on a shelf or table, not the floor
- keep away from other devices
- avoid thick walls and large objects
We’ve sent you a lovely box of goodies you need to get set up. In the box you’ll find:
- Connect the Hub Two
Plug one red end of the Ethernet cable into the hub’s WAN port. Then plug the other red end into the PORT 1 / LAN 1 port on your Openreach Optical Network Terminal or ONT. The number of ports on your ONT may differ. - Connect the power supply
Slide the two parts of the power supply together until they click into place. Plug the hub into a mains socket and press the Power button. After around three minutes, a blue light will show that the hub is ready. - Connect your devices
Use the hub’s WiFi name and password to connect your devices to the Internet. You’ll find these on the pull-out card on the back of the hub or on the sticker we sent you. You can also connect in other ways:
- QR code - scan it for a quick connection.
- WPS - press the hub’s WPS button which will flash blue, then follow your device’s instructions.
- Ethernet - plug the yellow ended cable into your device and the hub.
Control WiFi and hub settings
Check or change your WiFi settings, including port forwarding.
To view the Hub Manager:
- Open a new browser window e.g Chrome, Firefox or Safari.
- Enter 192.168.1.254 in the address bar.
You'll see a security warning when accessing the Hub Manager, this is normal and safe to continue. From here you can manage the hub settings, and change your WiFi name and password. Some settings need the hub admin password, which you'll find on the back of the hub or on the password sticker.
If you’re having issues with your broadband, try selecting the Help tile on the Hub Manager home page.
The WiFi network or SSID starts with PLUSNET and has letters or numbers at the end, e.g. PLUSNET-1A2B3C. The WiFi password or key is 10 characters long and it's case sensitive.
To check your settings:
- Log into the Hub Manager.
- Click Wireless.
- Enter your admin password.
You’ll now see information about the WiFi bands broadcasting from the hub. Click the i icon to the left of each item for an explanation of what it does.
To change the WiFi settings of the hub:
- Log into the Hub Manager.
- Click Wireless.
- Enter your admin password.
- Click Change settings.
You might need to reconnect to your network after changing some of these settings, particularly the Network name, Security type or Security password. Click the i icon to the left of each item for an explanation of what it does.
The Hub supports UPnP which means that compatible games and applications will set up Port Forwarding automatically and you won't have to do anything. For games and apps that don't support this, you can set up Port Forwarding manually.
- Log into the Hub Manager.
- Click Advanced Settings.
- Enter your admin password and then click Firewall.
- Click Create a new port forwarding rule.
- Enter the details for your port forwarding rule.
- Click the + icon.
- Click Save.
Connection help
Check the hub lights or do a factory reset on the hub.
If you think there's an issue with the Hub Two, follow these steps and then check the lights to see what's wrong.
First, check everything's plugged in, switch your computer and other devices off and then on again.
What the hub lights mean
Blue
The hub is connected to your broadband.
If you can’t get online, try restarting your device. If this is your first time connecting, wait a minute or two.
Orange
The hub is on, but isn’t connected to the Internet.
Connect a device to the hub. Open a new web browser window and follow the on-screen steps to get connected. If that doesn’t work, try resetting the hub.
No light
The power is off or the lights have been turned off in the Hub Manager.
Check the hub is plugged in and switched on. If needed, turn the lights back on in the Hub Manager.
Red
There’s a problem with your connection.
Use the power button to turn the hub off and on again. If it still doesn’t turn blue, reset it.
Green
The hub is starting up.
Wait about three minutes for it to turn blue. If it stays green, restart or reset the hub.
Pink
The hub is in Bridge Mode
The hub has been switched to 'modem only' mode. Full Fibre doesn't support this. You can disable Bridge Mode in the Hub Manager. If needed, reset the hub.
Flashing orange
The hub is working but the Ethernet cable isn't connected
Check if the Ethernet cable with red ends is plugged in properly. If your ONT's got more than one PORT / LAN port, then try each one. Wait a few minutes each time to see if the light stops flashing.
WPS button
Flashing blue
If it's flashing blue it's waiting for you to press the WPS button on your computer or device.
Flashing red
If it's flashing red, it didn’t connect. Give it a couple of minutes and try again.
No connection:
- check the hub is switched on and lights are showing
- check the cables are connected to the ONT
- restart the hub off, wait 30 seconds, then switch it back on
Slow or dropping WiFi:
- test your connection near the hub
- place the hub somewhere more open and central
- keep it off the floor on a shelf or table
- keep it away from other devices and obstacles
If you're still having issues, do a factory reset:
- Use a paper clip, pen or something pointed to press the reset pinhole on the back of the router.
- Keep the button pressed for 20 seconds, until the light on the front of the hub turns green, then release the reset button.
- When the light on the front turns blue, it's now restored to factory settings.
Important when resetting the hub, all of the original factory settings will be restored. So any changes you’ve made will be lost, meaning you’ll need to set them up again.
How to reconnect and set up the Hub One
For the best experience:
- place our hub near where you use WiFi most
- avoid the kitchen, cupboards or enclosed spaces
- position it on a shelf or table, off the floor
- don’t put it on carpets or next to other devices
- keep it away from thick walls and large objects
Wireless connection
To connect wirelessly, follow the steps on your device to connect to our router using WiFi. If you need help, see our wireless connection guide.
You’ll find your network name and password on the handy reference card on the back of the hub.
The WiFi network or SSID starts with PLUSNET and has letters or numbers at the end, e.g. PLUSNET‑A1BC. The WiFi password or key is 10 characters long and it's case sensitive.
Wired connection
If you’re using an Ethernet cable with yellow ends:
- Plug one end into any of the four yellow Ethernet ports on the back of the hub.
- Plug the other end into the Ethernet port on your computer or laptop.
This is the easy part. Give the hub a few minutes to configure settings and connect to the Internet. While it's doing this, go make yourself a drink.
Wait for at least five minutes before moving on to the next step.
Once it’s ready, open a web browser such as Chrome, Safari or Firefox. You should be able to see your homepage.
- Check all cables are connected properly and restart your devices.
- Press and hold the hub's Restart button until the light turns orange.
- Wait for the hub to restart. The light will cycle through green, blue and orange.
- When the light turns solid blue, you're back online.
- If the light doesn't stay blue, check the troubleshooting steps for the light colour you're seeing.
Power lights status at the back of the hub
Power light is green or flashing green
Wait a few of minutes for the hub to start. The light will stay blue for more than 20 seconds when it's ready.
Power light is blue
The hub is working fine. If you can't get online, check your device or computer settings.
Power light is off
The hub isn’t getting power. Check the switch on the back is on, the power cable is plugged in and the mains is switched on.
Power light is orange
There’s a connection problem. Log in to the Hub Manager at 192.168.1.254 and check the Internet status. If it says ‘Disconnected’, click Connect.
Power light is red
There’s a problem with the hub. Press Restart and release when the light turns orange.
It should restart and turn blue. Still red? Reset using the button on the back.
Broadband lights status at the front of the hub
Broadband light is orange
You're connected to broadband but your account might not be switched on yet. Wait until after midnight on your activation day.
Broadband light is red
You've tried to log in with the wrong username and password. Reset the hub to factory settings using the Reset button on the back. Your default details are on the card that came with the hub.
Broadband light is flashing red
There’s a problem with your broadband line. Check all cables are plugged in correctly and that it’s after midnight on your activation day.
WiFi Protected Setup or WPS lights status on the side of the hub
Wireless light is orange
You've switched off wireless security for one or both wireless channels. Turn on your security in the wireless tab in the Hub Manager at 192.168.1.254
Wireless light is flashing orange
The hub is in WPS mode. Press the Connect button on your device to join without a password. It will return to normal after a few minutes.
If you're still having issues, do a factory reset:
- Use a paper clip, pen or something pointed to press the reset pinhole on the back of the router near the power and USB ports.
- Keep the button pressed for 20 seconds, until the light on the front of the hub turns or flashes green.
- Let it restart. Release the button and wait roughly five minutes for the hub to complete its startup sequence and reconnect
Important by resetting our hub, restores it back to the factory settings. Any changes you’ve made will be lost, so you’ll need to set them up again.
Microfilters stop your phone and broadband signals interfering with each other. Without them, you may experience connection issues, slow speed, or noise on your phone line.
Check what type of socket you have:
- Standard master socket or no master socket. Use a microfilter to connect the hub.
- Double master socket. No microfilter is needed. Connect the hub directly to the smaller socket.
Connect the microfilters
- Connect one end of the grey Internet cable to the DSL port on the hub, and the other end to the DSL port on the microfilter.
- We recommend using the master telephone socket for the best speeds. It’s closest to where the phone line enters your property.
- As well as your phone, sockets can be used by alarm systems and digital TV boxes, so make sure you don't miss any.
Plug in the Hub One
- Slide the three-pin plug onto the power unit until it clicks into place.
- Plug the power cable into the hub and switch on. The hub lights should now come on.
How to reconnect and set up the Hub Zero 2704n
For the best experience:
- place our hub near where you use WiFi most
- avoid the kitchen, cupboards or enclosed spaces
- position it on a shelf or table, off the floor
- don’t put it on carpets or next to other devices
- keep it away from thick walls and large objects
Microfilters stop your phone and broadband signals interfering with each other. Without them, you may experience connection issues, slow speed, or noise on your phone line.
Check what type of socket you have:
- Standard master socket or no master socket. Use a microfilter to connect the hub.
- Double master socket. No microfilter is needed. Connect the hub directly to the smaller socket.
Connect the microfilters
- Connect one end of the grey Internet cable to the DSL port on the hub, and the other end to the DSL port on the microfilter.
- We recommend using the master telephone socket for the best speeds. It’s closest to where the phone line enters your property.
- As well as your phone, sockets can be used by alarm systems and digital TV boxes, so make sure you don't miss any.
Plug in the Hub Zero 2704n
- Slide the three-pin plug onto the power unit until it clicks into place.
- Plug the power cable into the hub and switch on. The hub lights should now come on.
- At the bottom of your router, you'll see two little 'feet' to help it stand. Extend them out so it's sitting steady
- Put the power adapter together by sliding the plug into the main unit the black box until you hear it click into place. Then plug this part into a wall socket, and the other side into the back of your router.
- Find the Ethernet cable with the red ends. It came with your router. Plug one end into the LAN 1 socket on your Openreach modem. Then plug the other end into the fourth Ethernet socket on the back of the router. It's the one that has a red sticker under it
- Press the black power button at the back of the router to switch on. When the Power light goes green, it's on. But this can take about a minute
Wireless connection
To connect wirelessly, follow the steps on your device to connect to our router using WiFi. If you need help, see our wireless connection guide
You’ll find your network name and password on the handy reference card on the back of the hub.
- Your WiFi network name or SSID starts with PLUSNET followed by letters or numbers, for example: PLUSNET‑A1BC.
- Your WiFi password or key is 10 characters long and case sensitive, so enter it exactly as shown.
Wired connection
This is the easy part. Give the hub a few minutes to configure settings and connect to the Internet. While it's doing this, go make yourself a drink.
Wait for at least five minutes before moving on to the next step.
Once it’s ready, open a web browser such as Chrome, Safari or Firefox. You should be able to see your homepage.
If the broadband light is flashing instead of solid green, there may be an issue with the broadband signal. Follow the steps in our connection troubleshooting guide
Power lights status
Power off
It's off. Check the cables and that you've switched it on at the back and at the wall socket.
Power red
It couldn't start up and went into recovery mode.
Power green
It's ready to use.
Broadband lights status
Broadband off
It's in Fibre mode. Check the lights on the Openreach modem instead.
Broadband flashing
There's a problem with the broadband signal. Make sure all the cables and microfilters are plugged in properly.
Broadband green
Broadband's detected and working.
Internet lights status
Internet off
There's no Internet connection.
Internet red
The Internet connection isn't working. Open your web browser and following the steps on your screen. It might be because you've used the wrong username and password, so double check them and try again.
Internet green
It's connected to the Internet.
Internet flashing
It's transferring data.
WiFi lights status
WiFi off
WiFi's off.
WiFi green
WiFi's on.
WiFi flashing
It's transferring data.
Ethernet lights status
Eth 1-4 off
There aren't any devices connected with the Ethernet cable.
Eth 1-4 green
You've got a device connected using an Ethernet cable.
Eth 1-4 flashing
It's transferring data.
WiFi Protected Setup or WPS lights status
WPS off
WPS's off.
WPS flashing
WPS's on and ready to connect.
Openreach modem lights status
Power off
It's switched off.
Power yellow
It's starting up. It should turn green shortly.
Power green
It's powered up and ready to use.
DSL off
It can't find a broadband signal.
DSL flashing green
There's a problem with your broadband connection.
DSL green
Your broadband's connected and working.
LAN 1 off
It can't find a connection to your router or the Ethernet cable isn't connected.
LAN 1 green
The Ethernet cable's connected.
LAN 1 flashing
It's transferring data.
If you're still having issues, do a factory reset:
- Use a paper clip, pen or something pointed to press the reset pinhole on the back of the router near the power and USB ports.
- Keep the button pressed for 20 seconds, until the light on the front of the hub turns or flashes green.
- The Hub Zero won’t automatically configure itself following a factory reset. You’ll need to manually re-enter your broadband username and password using the Hub Manager. If you need help with this then get in touch.
Important by resetting our hub, restores it back to the factory settings. Any changes you’ve made will be lost, so you’ll need to set them up again.
Plusnet broadband and EE mobile deals
Go faster by upgrading your Plusnet broadband and get a great SIM-only deal from EE.

More ways to get help

Plusnet community
Our customers always have tips to share.
Talk to our community


Sign Language service
Contact us using British Sign Language

My Account
Manage your bills, packages and details.
Sign into Broadband
